Register Log In

  • Home
  • About
  • Recipes
    • Beef
    • Breads
    • Breakfast
    • Burgers
    • Candy bars
    • Chicken
    • Chocolate
    • Desserts
    • Dinner
    • Fish
    • Lamb
    • Meal under 30 minutes
    • Pork
    • Salads
    • Sauces and Dips
    • Soups
    • Vegetables
    • Vegetarian
  • Shop
  • Ingredients FYI
    • Food chemistry: How to make a great beef stew
    • What are the most popular pizza toppings?
    • What is Jicama?
  • How-to videos
    • Salsa Verde
    • 5-minute fried cauli rice
    • BBQ sauce
    • Marinara sauce
    • Jicama french fries
  • IMAGE
  • VIDEO

Keto Christmas Pinwheel Cookies

Servings: 24


INGREDIENTS

  • Dry ingredients
  • 150 g (1 1/4 cup)   almond flour  
  • 19 g (1/4 cup)   whey protein isolate powder   or substitute with   coconut flour  
  • 30 g (6 tbsp)   oat fiber  or coconut flour
  • 2 g (1/3 tsp) salt
  • 4 g (1 tsp) baking soda or baking powder
  • 2 g (1/2 tsp)   glucomannan  
  • 140 g (3/4 cup)  monk fruit sweetener   - ground to confectionery
  • Wet ingredients
  • 95 g (7 tbsp)  unsalted butter  – room temperature
  • 2 large eggs
  • 8 g (2 tsp)   pure vanilla extract  
  • 0.3 g (1/16 tsp)   Wilton red gel food color 
  • 0.3 g (1/16 tsp) Wilton Kelly green gel no taste food color

DIRECTIONS

  • Step 1: Make the full batch of my Keto Sugar Cookie Recipe
  • 1.   Place a fine sieve over a deep mixing bowl and add the almond flour, whey protein isolate, oat fiber, salt, baking soda or baking powder and glucomannan

  • 2.   Whisk the dry ingredients in the sieve. Discard any large pieces that do not pass through sieve. Set aside

  • 3.   Put the paddle attachment onto your stand mixer

  • 4.   Add the butter and beat on medium speed for 2 – 3 minutes, until butter is very pale yellow. Scrape the side and bottom of bowl during the beating time

  • 5.   Add the eggs one at a time, beating on medium speed between additions of each egg, to incorporate the egg and butter. The mixture will look curdled

  • 6.   Stop the beater and add the vanilla and confectionery sweetener. Blend with a spatula and then resume beating on low speed for several minutes

  • 7.   Add one cup of the dry ingredient flour mixture to the butter and beat to combine. Continue adding the flour mixture until all of it has been combined with the butter and egg mixture and you have a smooth creamy cookie dough

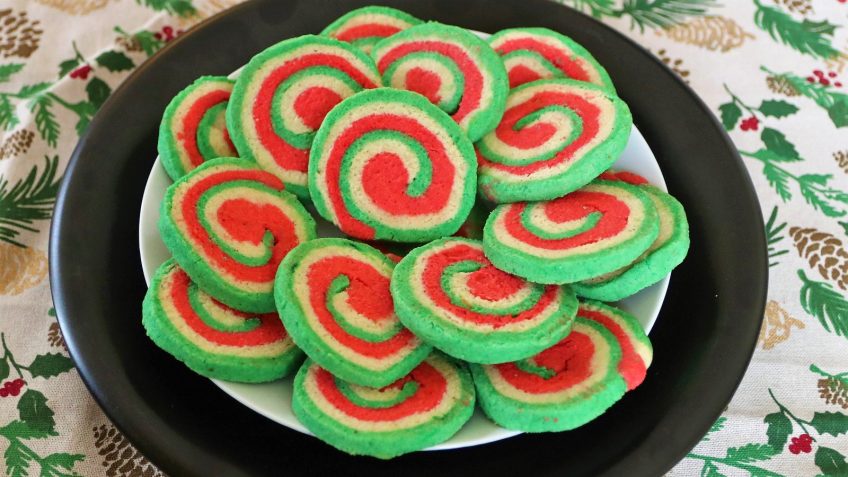
  • 8.   Weigh the cookie dough and divide into three equal quantities. Place two of the soft dough balls into individual bowls. To one bowl add the Kelly green gel food color. Fold and knead the dough until the color is well distributed and the dough is an even color with no streaks. Repeat for the other bowl where you add the red gel food color

  • 9.   Shape each of the dough balls into an individual brick, which is wrapped in individual cling wrap or parchment. Refrigerate for 3 to 4 hours minimum, or until the dough is firm. Overnight is ideal

  • 10.   After chilling, place each individual color of dough onto a sheet of parchment. Using either painter sticks or chop sticks as guides to ensure even thickness, place a second sheet of parchment on top. Roll the dough and trim the dough to form a rectangle. Place the rolled out rectangle onto a cookie sheet and refrigerate. Repeat with each of the red and green dough balls. NOTE: make sure your rectangles are exactly the same width and length (same-sized rectangles): this is VERY IMPORTANT. Chill each rectangle for about 30 – 60 minutes to firm up again – this will make it easier to layer and to roll

  • Step 2: Roll into cylinder and cut into pinwheels
  • 11.   When the rectangles have firmed up a bit, choose which color you want on the outside, either red or green and lay that as the first layer. Carefully position the white layer to match exactly over the bottom layer. Lastly, carefully place the alternate color on top of the white layer

  • 12.   Take hold of the parchment at one end of the rectangle and, using your fingers to guide the dough, roll the dough into a cylinder shape. NOTE: apply enough pressure as you roll to ensure there are no air pockets or gaps. You want all the layers to be next to each other with no spaces in between

  • 13.   After rolling the three layers into a tube, wrap in the parchment and place the wrapped cylinder back into the refrigerator for about 30 – 60 minute to firm up before cutting. The firmer the dough, the easier it will be to cut into even thickness pinwheels

  • 14.   Preheat your oven to 150 C or 300 F

  • 15.   After chilling the cylinder unwrap and, using a very sharp knife or sharp scraper, cut into 1 cm or 1/3 inch pinwheels. Place onto a parchment-lined cookie sheet, leaving space between the cookies as they will expand when baking

  • 16.   Place in the middle position of a preheated oven. Bake for 8 -10 minutes ONLY – DO NOT overbake

  • 17.   Remove from the oven while cookies are still very pale and look raw in the center. Leave to cool on the cookie sheet. When cookies are completely cool, use a spatula to remove the cookies from the parchment and to transfer the cookies to a cooling rack. It will take about 8 hours for the cookies to be firm and ready to ice or eat. It is best if cookies air dry overnight

  • 18.   The cookies will last several days on the counter. If you plan on keeping them longer, store in an air tight container in the refrigerator. Enjoy!

MACRONUTRIENTS CHART

FYI

  • The cookies will look underdone when you first remove them from the oven, but note that the internal heat of the cookies will keep baking them as they cool down.
  • A word of caution: if you try moving the cookies from the cookie sheet to the cooling rack too soon, they will break or crumble. That would be such a shame.
  • When the cookies have cooled to room temperature on the cookie sheet, use your spatula, and carefully move the cookies onto a cooling rack and let them cool and crisp up for several hours. For best results, I have found that the cookies need to be on the counter for about 8 hours. I usually make and bake these cookies in the evening and let them cool overnight.
  • The next morning you will have perfect, pale, Christmas pinwheel cookies with each color looking nice and vibrant – in other words, you have created perfect Christmas 3-colored keto pinwheel sugar cookies – such perfection. These cookies are absolutely delicious and look so festive. ENJOY!

Recipe tags: chocolate pinwheel cookies, Christmas cookie pinwheels, Christmas pinwheel, Christmas pinwheel cookies, Christmas sugar cookies, Christmas swirl cookies, gluten free cookies, gluten free pinwheel cookies, keto christmas cookies, keto Christmas pinwheel, keto Christmas pinwheel cookies, keto Christmas sugar cookies, keto cookies, keto desserts, keto meals and recipes, keto recipes, keto sugar cookie recipe, low carb Christmas pinwheel cookies, low carb Christmas sugar cookies, low carb Christmas swirl cookies, low carb cookies, low carb desserts, low carb recipes, paleo pinwheel cookies, perfect sugar cookies, pinwheel cookies, pinwheel swirl cookies, sugar cookie recipe, sugar free Christmas cookies, sugar free cookies, sugar free pinwheel cookies, sugar swirl cookies
Leave Comment

or cancel reply

You may use these HTML tags and attributes: <a href="" title=""> <abbr title=""> <acronym title=""> <b> <blockquote cite=""> <cite> <code> <del datetime=""> <em> <i> <q cite=""> <s> <strike> <strong>

  • author By Angela Wilkes
  • GET YOUR FREE INTERACTIVE
    E-COOKBOOK

    • Already have an account? Sign In »
    • Lost your password?
  • Cuisine: American
  • Category: Desserts
  • Created: December 18, 2018

Translate Traducir
Oversætte übersetzen
번역 vertalen
翻訳する

Similar Recipes
  • Victoria Sponge Cake
  • Keto Butter Cookies, Christmas Tree and Teddy Bear
  • Cranberry Orange Custard Pie
Archives
  • March 2019
  • October 2018
  • November 2017
  • May 2017

All rights reserved © Angela Wilkes 2017-2022 Privacy Policy

Translate »